

Note: This article contains affiliate links. If you click on these links and make a purchase, I may earn a small commission at no extra cost to you. This helps support my research and content. Read my full affiliate disclosure here.
Repair Snapshot
Use a mechanic if the sensor is hard to access, wiring damage is present, or you need advanced diagnosis to confirm the MAF sensor is actually the problem.
This article is part of our Engine Maintenance & Repair Guides.
Replacing a mass air flow sensor is usually a simple DIY repair that can fix rough idle, hesitation, poor fuel economy, and check engine lights caused by bad airflow readings.
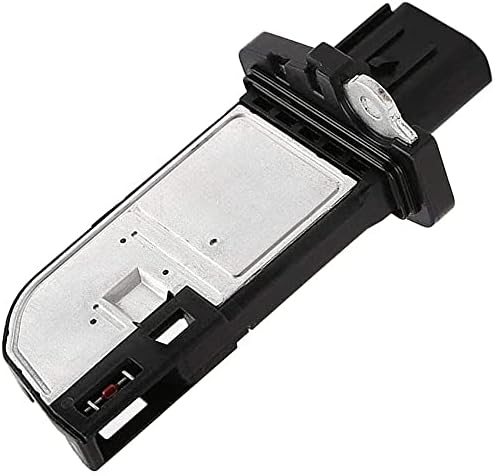
On most cars, the mass air flow sensor, often called the MAF sensor, sits in the air intake tube between the air filter box and the throttle body. It measures how much air is entering the engine so the computer can deliver the right amount of fuel. When the sensor fails or sends incorrect readings, the engine may run lean or rich, idle unevenly, or feel sluggish during acceleration.
This guide walks through how to remove and install a new MAF sensor, when to disconnect the battery, how to avoid damaging the sensor element, and what to check after the repair. Because some drivability problems can also be caused by vacuum leaks or intake issues, it is smart to confirm the diagnosis before buying parts.
Before You Start
A mass air flow sensor replacement is straightforward on many vehicles, but part quality and diagnosis matter. Some aftermarket sensors work fine, while others create new idle or fuel trim problems right out of the box. If possible, compare the old and new parts before installation and use a quality replacement that matches your engine and trim level.
Common Signs of a Bad MAF Sensor
- Check engine light with codes such as P0101, P0102, P0103, or related fuel trim faults.
- Rough idle, stalling, hesitation, or surging during acceleration.
- Poor fuel economy or a noticeable drop in engine performance.
- Hard starting or an engine that runs better with the sensor unplugged.
- Transmission shift quality changes on some vehicles because load calculations are affected.
Make Sure the Sensor Is Really the Problem
Do not replace the MAF sensor automatically just because a code points to it. Air leaks between the MAF and throttle body, a loose intake clamp, a torn air duct, dirty air filter housing seals, or damaged sensor wiring can trigger similar symptoms. Inspect the intake tube and connector first. If the sensor is only dirty, some vehicles can be fixed by cleaning it with dedicated MAF sensor cleaner, but if the sensor is internally failed, replacement is the better repair.
Locate the Mass Air Flow Sensor
Open the hood and trace the intake path from the air filter box toward the engine. The MAF sensor is typically mounted in the air tube just after the filter box. On some vehicles, the sensor is a small removable insert attached with two screws. On others, the entire housing section is replaced as one assembly.
Look for an electrical connector with several wires and a sensor body positioned directly in the airflow stream. If access is tight, remove any decorative engine cover or loosen the intake duct as needed. Before disconnecting anything, note the sensor orientation and airflow direction. Many sensors have an arrow showing which way air should flow.
Check the Replacement Part Before Removal
Match the connector shape, mounting points, sensor depth, and any O-ring or gasket included with the new part. If the replacement looks different in any important way, stop and verify the correct application. Installing the wrong MAF sensor can cause immediate drivability issues.
Prepare the Vehicle Safely
Park on a level surface, set the parking brake, and turn the engine off. Let hot engine components cool down before reaching around the intake area. Wear gloves and keep dirt away from the open air intake path.
Should You Disconnect the Battery?
On many vehicles, you can replace the MAF sensor without disconnecting the battery as long as the key is fully off. That said, disconnecting the negative battery cable is a good precaution if the connector is hard to access, if you might short a terminal with a tool, or if your service information recommends it. Be aware that disconnecting the battery may reset radio presets and idle memory.
Important Handling Warning
Never touch the sensing wire or internal element inside the MAF sensor. Even light contact can damage it or contaminate it with skin oils. Also avoid compressed air, brake cleaner, or carb cleaner on the sensor element. Those products can ruin the part.
Tools That Make This Job Easier


Remove the Old Mass Air Flow Sensor
Disconnect the Electrical Connector
Press the connector lock tab and pull the connector straight off the sensor. If it is stuck, do not yank on the wires. Use a small pick or flat screwdriver carefully to release the lock, then wiggle the connector free. Inspect the plug for corrosion, bent terminals, broken locks, or oil contamination. Wiring damage can mimic a failed sensor.
Remove the Mounting Hardware
Depending on the design, remove the Torx screws, Phillips screws, small bolts, or hose clamps holding the sensor or sensor housing in place. Keep the hardware organized. If the sensor is mounted in a plastic housing, use only enough force to loosen the fasteners. Overtightening or rough handling can crack the housing.
Lift Out the Sensor Carefully
Pull the sensor straight out of the housing, or remove the entire airflow tube section if that is how your replacement is built. Watch for an O-ring, gasket, or sealing lip that may stick in place. If the old seal remains in the housing, remove it so the new part can seat correctly.
Take a moment to inspect the air box and intake tube for debris, cracks, or a loose clamp. Replacing the MAF sensor will not help if unmetered air is entering the engine downstream of the sensor.
Install the New Mass Air Flow Sensor
Transfer Seals Only if Required
Some replacement sensors include a new O-ring or gasket, while others reuse the original seal. If reusing an old seal is allowed, make sure it is not flattened, cracked, or torn. A damaged seal can cause air leaks and inaccurate readings. Lightly seat the seal so it stays in position during installation.
Orient the Sensor Correctly
Install the sensor in the same direction as the old one. If there is an airflow arrow, it must point toward the engine. A reversed sensor will cause immediate performance problems and often trigger a check engine light.
Tighten the Fasteners Evenly
Start all screws or bolts by hand to avoid cross-threading. Tighten them evenly until snug. These fasteners are usually small and thread into plastic or soft inserts, so do not overtighten. If you have factory torque specs, use them. If not, a gentle snug fit is typically enough. Reinstall any intake clamps and make sure the duct is fully seated.
Reconnect the Electrical Connector
Push the connector on until it clicks into place. If desired, apply a tiny amount of dielectric grease to the connector seal area, not the terminals themselves, to help keep moisture out. Confirm the harness is routed safely away from moving parts and hot engine surfaces.
Reassemble and Inspect the Intake System
Before starting the engine, go back through everything you touched. This step is important because a loose intake tube or unplugged vacuum line can create the same symptoms you were trying to fix.
- Confirm the sensor is fully seated and installed in the correct direction.
- Make sure all screws, bolts, and hose clamps are snug.
- Check that the air filter box is closed properly and its clips are secured.
- Verify the electrical connector is latched completely.
- Inspect the intake duct for splits, tears, or disconnected breather hoses.
If you disconnected the battery, reconnect the negative cable now. Tighten the terminal securely, but do not overtighten and damage the battery post.
Recommended Tools for This Job


Clear Codes and Perform a Post-Repair Check
Clear the Trouble Codes
Use a scan tool or code reader to clear any stored MAF-related trouble codes. On some vehicles, the engine computer will adapt to the new sensor on its own after several drive cycles, but clearing codes lets you confirm whether the repair solved the issue more quickly.
Start the Engine and Let It Idle
Start the engine and listen for hissing, whistling, or an unstable idle that could indicate an air leak. The idle may fluctuate briefly while the computer relearns, especially if the battery was disconnected, but it should settle down within a short time.
Take a Short Road Test
Drive the vehicle under light and moderate throttle. Watch for smoother acceleration, improved idle quality, and the absence of a check engine light. If your scan tool can display live data, compare airflow readings and fuel trims before and after the repair. Extremely high positive fuel trims after replacement may point to a vacuum leak rather than a bad sensor.
Torque Notes, Relearns, and When Extra Steps Are Needed
Most MAF sensor replacements do not involve major torque-critical hardware, but you should still follow factory specs whenever available. The mounting screws are small and often thread into plastic, so the biggest risk is overtightening, not undertightening. Intake tube clamps should be tight enough to seal fully without deforming the duct.
A dedicated bleed procedure is not required for this repair because no fluid system is opened. However, some vehicles may need a brief idle relearn after battery disconnect. If the idle remains unstable, let the engine reach operating temperature with all accessories off, then drive normally so the computer can continue adapting.
If the replacement does not fix the problem, check for intake leaks, restricted air filters, damaged wiring, poor ground connections, aftermarket oiled air filters that contaminated the sensor, or unrelated issues such as a failing oxygen sensor or throttle body problems.
Common Mistakes to Avoid
- Replacing the sensor without checking for a split intake boot or loose clamp.
- Installing the sensor backward and ignoring the airflow direction arrow.
- Touching the sensing element or contaminating it during installation.
- Using cheap low-quality parts that cause immediate drivability problems.
- Forgetting to reconnect the electrical connector or secure the air box.
- Assuming a MAF code always means the sensor itself has failed.
Avoiding these mistakes can save time, money, and a second round of diagnosis. If symptoms return right away after replacement, recheck the connector, intake seals, and part number before assuming the new sensor is defective.
When to Stop and Call a Professional
Call a professional if the connector is damaged, wires are broken near the plug, the sensor is buried under other components, or the vehicle still runs poorly after installation. A shop can smoke-test the intake system, scope the sensor signal, and compare fuel trim data to pinpoint whether the problem is really airflow measurement, vacuum leakage, or another engine management fault.
Professional help is also a good idea if your vehicle has repeated MAF sensor failures. In those cases, the root cause may be contamination from an over-oiled air filter, water intrusion, charging system problems, or a wiring issue that will damage the replacement sensor too.
Key Takeaways
- Verify the MAF sensor is the actual problem by checking for intake leaks, wiring damage, and a loose air duct before replacing parts.
- Handle the new sensor carefully, never touch the sensing element, and install it in the correct airflow direction.
- Snug the small fasteners gently and make sure every clamp, seal, and connector in the intake system is fully secured.
- Clear codes and road test the vehicle after the repair so you can confirm the check engine light and drivability symptoms are gone.
- If the engine still runs poorly after replacement, diagnose vacuum leaks and wiring faults before blaming the new sensor.
FAQ
Can I Drive with a Bad Mass Air Flow Sensor?
Usually yes for a short time, but it is not ideal. A bad MAF sensor can cause poor fuel economy, rough running, stalling, and possible catalytic converter damage if the engine runs too rich for too long.
Do I Need to Disconnect the Battery to Replace a MAF Sensor?
Not always. Many vehicles allow replacement with the key off, but disconnecting the negative battery cable is a safe precaution if access is tight or your service information recommends it.
Should I Clean the MAF Sensor Instead of Replacing It?
If the sensor is only dirty, cleaning with dedicated MAF sensor cleaner may help. If the sensor has failed electrically or cleaning did not solve the issue, replacement is the correct repair.
Will a New MAF Sensor Turn Off the Check Engine Light by Itself?
Sometimes after several drive cycles, but the fastest way to confirm the repair is to clear the codes with a scan tool and see whether they return.
What Happens if I Install the MAF Sensor Backward?
The engine can run very poorly, idle roughly, hesitate, or set fault codes because the sensor will measure airflow incorrectly. Always follow the airflow arrow or match the old sensor orientation exactly.
Why Is My Car Still Running Badly After Replacing the MAF Sensor?
Common causes include a vacuum leak, torn intake boot, bad wiring, a poor-quality replacement sensor, or a different issue such as throttle body, oxygen sensor, or fuel delivery problems.
Do I Need to Program or Calibrate a New Mass Air Flow Sensor?
Most vehicles do not require programming for a direct-fit replacement. The engine computer may need a short relearn period, especially if the battery was disconnected, but no special calibration is usually needed.
How Long Does It Take to Replace a Mass Air Flow Sensor?
On most vehicles, the job takes about 20 to 45 minutes. It can take longer if access is restricted or if you need extra diagnosis to verify the fault.
Need Parts for This Repair?
The right parts and supplies vary by vehicle.
Select your make and model to find compatible parts and accessories for your car.
Exact Fit
Parts that fit your make and model
Quality You Can Trust
Top brands and OEM quality options
Fast Shipping
Get the parts you need, delivered fast